Products
Modified balls
Discover our product range
No matching products found.
CMM Reference balls
-
CMM Reference balls
✖CMM Reference balls
(A) Ball Diameter (mm) (A) Ball Diameter (inches) (B) Length (mm) (B) Length (inches) (C) Thread 9.525 0.375 - 2.000 M6 or 1/4UNF 10 0.39370 50 - M6 12.7 0.500 - 2.000 M6 or 1/4UNF 15 0.59055 50 - M6 15.875 0.625 - 2.000 M6 or 1/4UNF 19.05 0.750 - 2.000 M6 or 1/4UNF 20 0.7878 50 - M6 22.225 0.8750 - 2.000 M6 or 1/4UNF 25 0.98425 50 - M6 25.4 1.000 - 2.000 M6 or 1/4UNF 50 1.9685 100 - M10 -
Holders for CMM reference balls
✖Holders for CMM reference balls
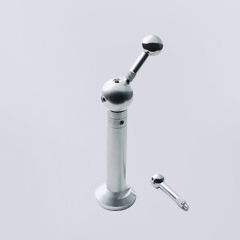
The purpose of the clamping device is to get a stable and fixed base for mounting CMM reference balls. To avoid vibrations, standard clamping devices of stainless steel are made, with a strong holder filled with sand. If required, they can also be supplied with a magnetic holder or fixture.
The unique clamping device for multiple positioning is a simple and efficient solution for mounting reference balls for the measurement of plane surfaces. The reference ball can be mounted in each of the positions shown above. The unit can be supplied with a holder, with a thread, or a magnetic holder as desired. The height up to the middle of the mounting block is normally 150 mm or 6 inches, depending on the ball dimensions, or according to your specifications.
Reference balls
-
Type 1
✖Type 1
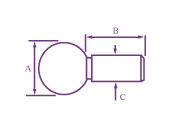
(A) Ball Diameter (B) Length (C) Stem Diameter 6mm 12mm 3mm 0.2500" 0.500" 0.1250" 8mm 6mm 4mm 0.3750" 0.750" 0.1875" 10mm 20mm 5mm 12mm 24mm 6mm 0.5000" 1.000" 0.2500" 15mm 30mm 7.5mm 0.6250" 1.250" 0.3125" 0.7500" 1.500" 0.3750" 20mm 40mm 10mm 0.8750" 1.750" 0.4375" 25mm 50mm 12.5mm 1.0000" 2.000" 0.5000" 30mm 50mm 15mm Dimensions:
see table, custom dimensions available on inquiry
-
Type 2
✖Type 2
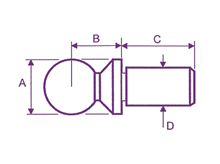
(A) Ball Diameter (B) Length +/-5um (C) Length (D) Diameter +0.00-5.0um 6mm 6mm 6mm 3mm 0.2500" 0.2500" 0.2500" 0.1250" 8mm 8mm 8mm 4mm 0.3750" 0.3750" 0.3750" 0.1875" 10mm 10mm 10mm 5mm 12mm 12mm 12mm 6mm 0.5000" 0.5000" 0.5000" 0.2500" 15mm 15mm 15mm 7.5mm 0.6250" 0.6250" 0.6250" 0.3125" 0.7500" 0.7500" 0.7500" 9.525mm 20mm 20mm 20mm 10mm 0.8750" 0.8750" 0.8750" 0.4375" 25mm 25mm 25mm 12mm 1.0000" 1.0000" 1.0000" 0.5000" 30mm 30mm 30mm 15mm Dimensions:
see table, custom dimensions available on inquiry
-
Type 3
✖Type 3
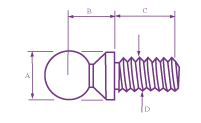
(A) Ball Diameter (B) Length +/-5um (C) Length (D) Thread 6mm 6mm 6mm M3 0.2500" 0.2500" 0.2500" 6-32 8mm 8mm 8mm M4 0.3750" 0.3750" 0.3750" 10-24 10mm 10mm 10mm M5 12mm 12mm 12mm M6 0.5000" 0.5000" 0.5000" 1/4UNF 15mm 15mm 15mm M8 0.6250" 0.6250" 0.6250" 5/16UNF 0.7500" 0.7500" 0.7500" 3/8UNF 20mm 20mm 20mm M10 0.8750" 0.8750" 0.8750" 7/16UNF 25mm 25mm 25mm M12 1.0000" 1.0000" 1.0000" 1/2UNF 30mm 30mm 30mm M12 Dimensions:
see table, custom dimensions available on inquiry
-
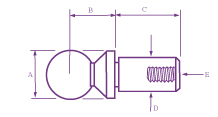
Type 4
✖Type 4
(A) Ball Diameter (B) Length +/-5um (C) Length (D) Diameter +0.00-5.0um (E) Thread 6mm 6mm 6mm 3mm M2 0.2500" 0.2500" 0.2500" 0.1250" 2-56 8mm 8mm 8mm 4mm M2 0.3750" 0.3750" 0.3750" 0.1875" 4-40 10mm 10mm 10mm 5mm M2 12mm 12mm 12mm 6mm M3 0.5000" 0.5000" 0.5000" 0.2500" 6-32 15mm 15mm 15mm 7.5mm M3 0.6250" 0.6250" 0.6250" 0.3125" 10-24 0.7500" 0.7500" 0.7500" 9.525mm 10-24 20mm 20mm 20mm 10mm M6 0.8750" 0.8750" 0.8750" 0.4375" 10-24 25mm 25mm 25mm 12mm M6 1.0000" 1.0000" 1.0000" 0.5000" 10-24 30mm 30mm 30mm 15mm M6 Dimensions:
see table, custom dimensions available on inquiry
-
Type 5
✖Type 5
(A) Ball Diameter (B) Length (C) Thread 6mm 8mm M2.5 0.2500" 0.312" 4-40 8mm 8mm M2.5 0.3750" 0.312" 4-40 10mm 8mm M2.5 12mm 8mm M2.5 0.5000" 0.312"
4-40 15mm 10mm M4 0.6250" 0.375" 6-32 0.7500" 0.375" 6-32 20mm 10mm M4 0.8750" 0.375" 10-32 25mm 10mm M6 1.0000" 0.375" 10-32 30mm 10mm M6 Dimensions:
see table, custom dimensions available on inquiry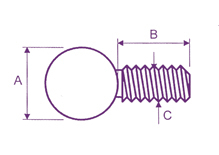
Plug gauges
-
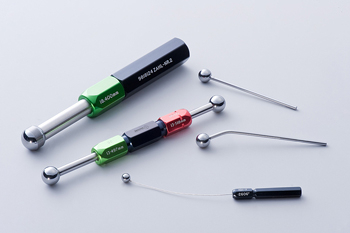
Double-ended plug gauge
✖Double-ended plug gauge
Options (mm) Go +2.0µm No Go -2.0µm Go +1.0µm No Go -1.0µm Go +0.5µm No Go -0.5µm Options (inches) Go +0.00008" No Go -0.00008" Go +0.00004" No Go -0.00004" Go +0.00002" No Go -0.00002" Double-ended plug gauge
Plug gauges have many advantages compared with traditional gauges. Fast and easy to use, since they can be inserted in any angle or corner. Owing to the very small contact surface, the inspector has a "very good feeling" and any unevenness can be determined easily. They are extremely efficient in determining indentations or narrowing in holes. The hard metal balls have a high resistance to impacts, wear, temperature, humidity and corrosion. The standard tolerances are +2.0 µm (0.00008 inches) on the go-side and -2.0 µm (0.00008 inches) on the no-go side. Narrower tolerances are possible at an additional cost. The UKAS measurement laboratory can provide a certification for your gauge. Additionally, it is also possible to engrave part numbers etc. in the handles according to your specifications. The pins are made of high-quality stainless steel.
Notes regarding design
For ball dimensions from 5/32 inch (4 mm) and above, the pin is inserted in a spark-eroded hole and fastened with a special glue. Below 5/32 inch (4 mm), the balls are hand soldered to the pin.
-
Single-ended plug gauge
✖Single-ended plug gauge
Options (mm) Go +2.0µm No Go -2.0µm Go +1.0µm No Go -1.0µm Go +0.5µm No Go -0.5µm Options (inches) Go +0.00008" No Go -0.00008" Go +0.00004" No Go -0.00004" Go +0.00002" No Go -0.00002" Single-ended plug gauge
Plug gauges have many advantages compared with traditional gauges. Fast and easy to use, since they can be inserted in any angle or corner. Owing to the very small contact surface, the inspector has a "very good feeling" and any unevenness can be determined easily. They are extremely efficient in determining indentations or narrowing in holes. The hard metal balls have a high resistance to impacts, wear, temperature, humidity and corrosion. The standard tolerances are +2.0 µm (0.00008 inches) on the go-side and -2.0 µm (0.00008 inches) on the no-go side. Narrower tolerances are possible at an additional cost. The UKAS measurement laboratory can provide a certification for your gauge. Additionally, it is also possible to engrave part numbers etc. in the handles according to your specifications. The pins are made of high-quality stainless steel.
Notes regarding design
For ball dimensions from 5/32 inch (4 mm) and above, the pin is inserted in a spark-eroded hole and fastened with a special glue. Below 5/32 inch (4 mm), the balls are hand soldered to the pin.

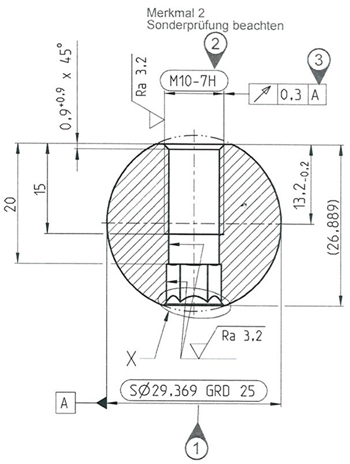
Special balls according to drawings
-
Special balls according to drawings
✖Special balls according to drawings
Filter
